Wednesday, March 24, 2021

A Burst of Color Art Journal

     Hello creative souls! Today I'm sharing my latest art journal spread using stamps, stencils, and Dylusions Paints. 


     I started by randomly stamping in Ranger Archival (Jet Black) ink with a Prima script stamp and the Finnabair (Trust the Magic and Net & Wire) stamps. 


     Stencils were the next step with TCW (Circle Grate) one stealing the show with all of her colors. I masked off six sections with tape, and used my mini blending tool to apply (Tangerine Dream, Lemon Drop, Island Parrot, Calypso Teal, London Blue, and Funky Fuchsia) Dylusions Paints.


     I just love the splats that were created with the (Well Rounded) stencil from TCW!


     The same stencil was used for the black rings that were applied with (Black Marble) Dylusions Paint. Then I made circles with my mini blending tool dipped into paints, and cut a smaller circle from a square sponge to get more depth.


     Finally, I made the title with the Tim Holtz (Cargo) stencil.

 
     Thanks for looking, and have a great week!

**********************
Challenges Entered:


Sunday, March 21, 2021

Steampunk Mixed Media Canvas

      Hi everyone! I never really thought that my dad looked like his dad, until I saw this photo of my late grandpa. But it could also be the mischievous look he has. Lol! 


     I started this canvas for my Dad's 70th Birthday, by collaging some torn papers, and playing cards with Prima Soft Matte Gel. Then I added white gesso, and Tim Holtz Distress (Crackle) Texture Paste. Once it dried, I applied black gesso to the Stamperia (Clock & Mechanisms) Stencil. Since my grandpa was always so playful and funny, I had to include the Joker, which you can see peeking through the gesso in the photo below, above the two of clubs card. 


          My Dad's love of poker, definitely came from my grandpa, and has always been a favorite family activity. Besides the real playing cards collaged onto the canvas, I also included the cards from Mintay Papers using the Old Manor Collection, aged with Lindy's Gang (Beaver Tail Brown) Squirt and (Landlubber Green Vintage) Spray. Then I recycled some fruit netting, and anchored it and the photo with the Steampunk Pipe Corner from Creative Embellishments.


     I was so happy to see the rocking horse, also from the Old Manor Collection from Mintay Papers, and have fond memories of riding one just like it on visits to my grandparents house as a child! The other fussy cut embellishments are all part of this fabulous vintage line, including the trunk, books, and paper screws, along with the paper that also got collaged onto the canvas, before coloring with Lindy's Gang (Beaver Tail Brown) Squirt and Sprays (Landlubber Green Vintage, Marigold Yellow Orange, Steampunk Sepia, and Ponderosa Pines Olive). 


     Some of the cogs and gears were made from paper clay using the Finnabair (Mechanica) Mould, and were all finished with Lindy's Gang Sprays, and embossing powders (Cleopatra Copper and Reindeer Moss Green). Then I added even more texture with Finnabair Rust Effect Paste (Brown and Dark Olive). I also rubbed some Finnabair (Rich Copper) Wax onto the black stenciling. 


     Thanks so much for looking, and take care!

*************************

Challenges Entered:

Lindy's Gang ~ March Color Challenge


Saturday, February 27, 2021

February Freeze Art Journal Spread

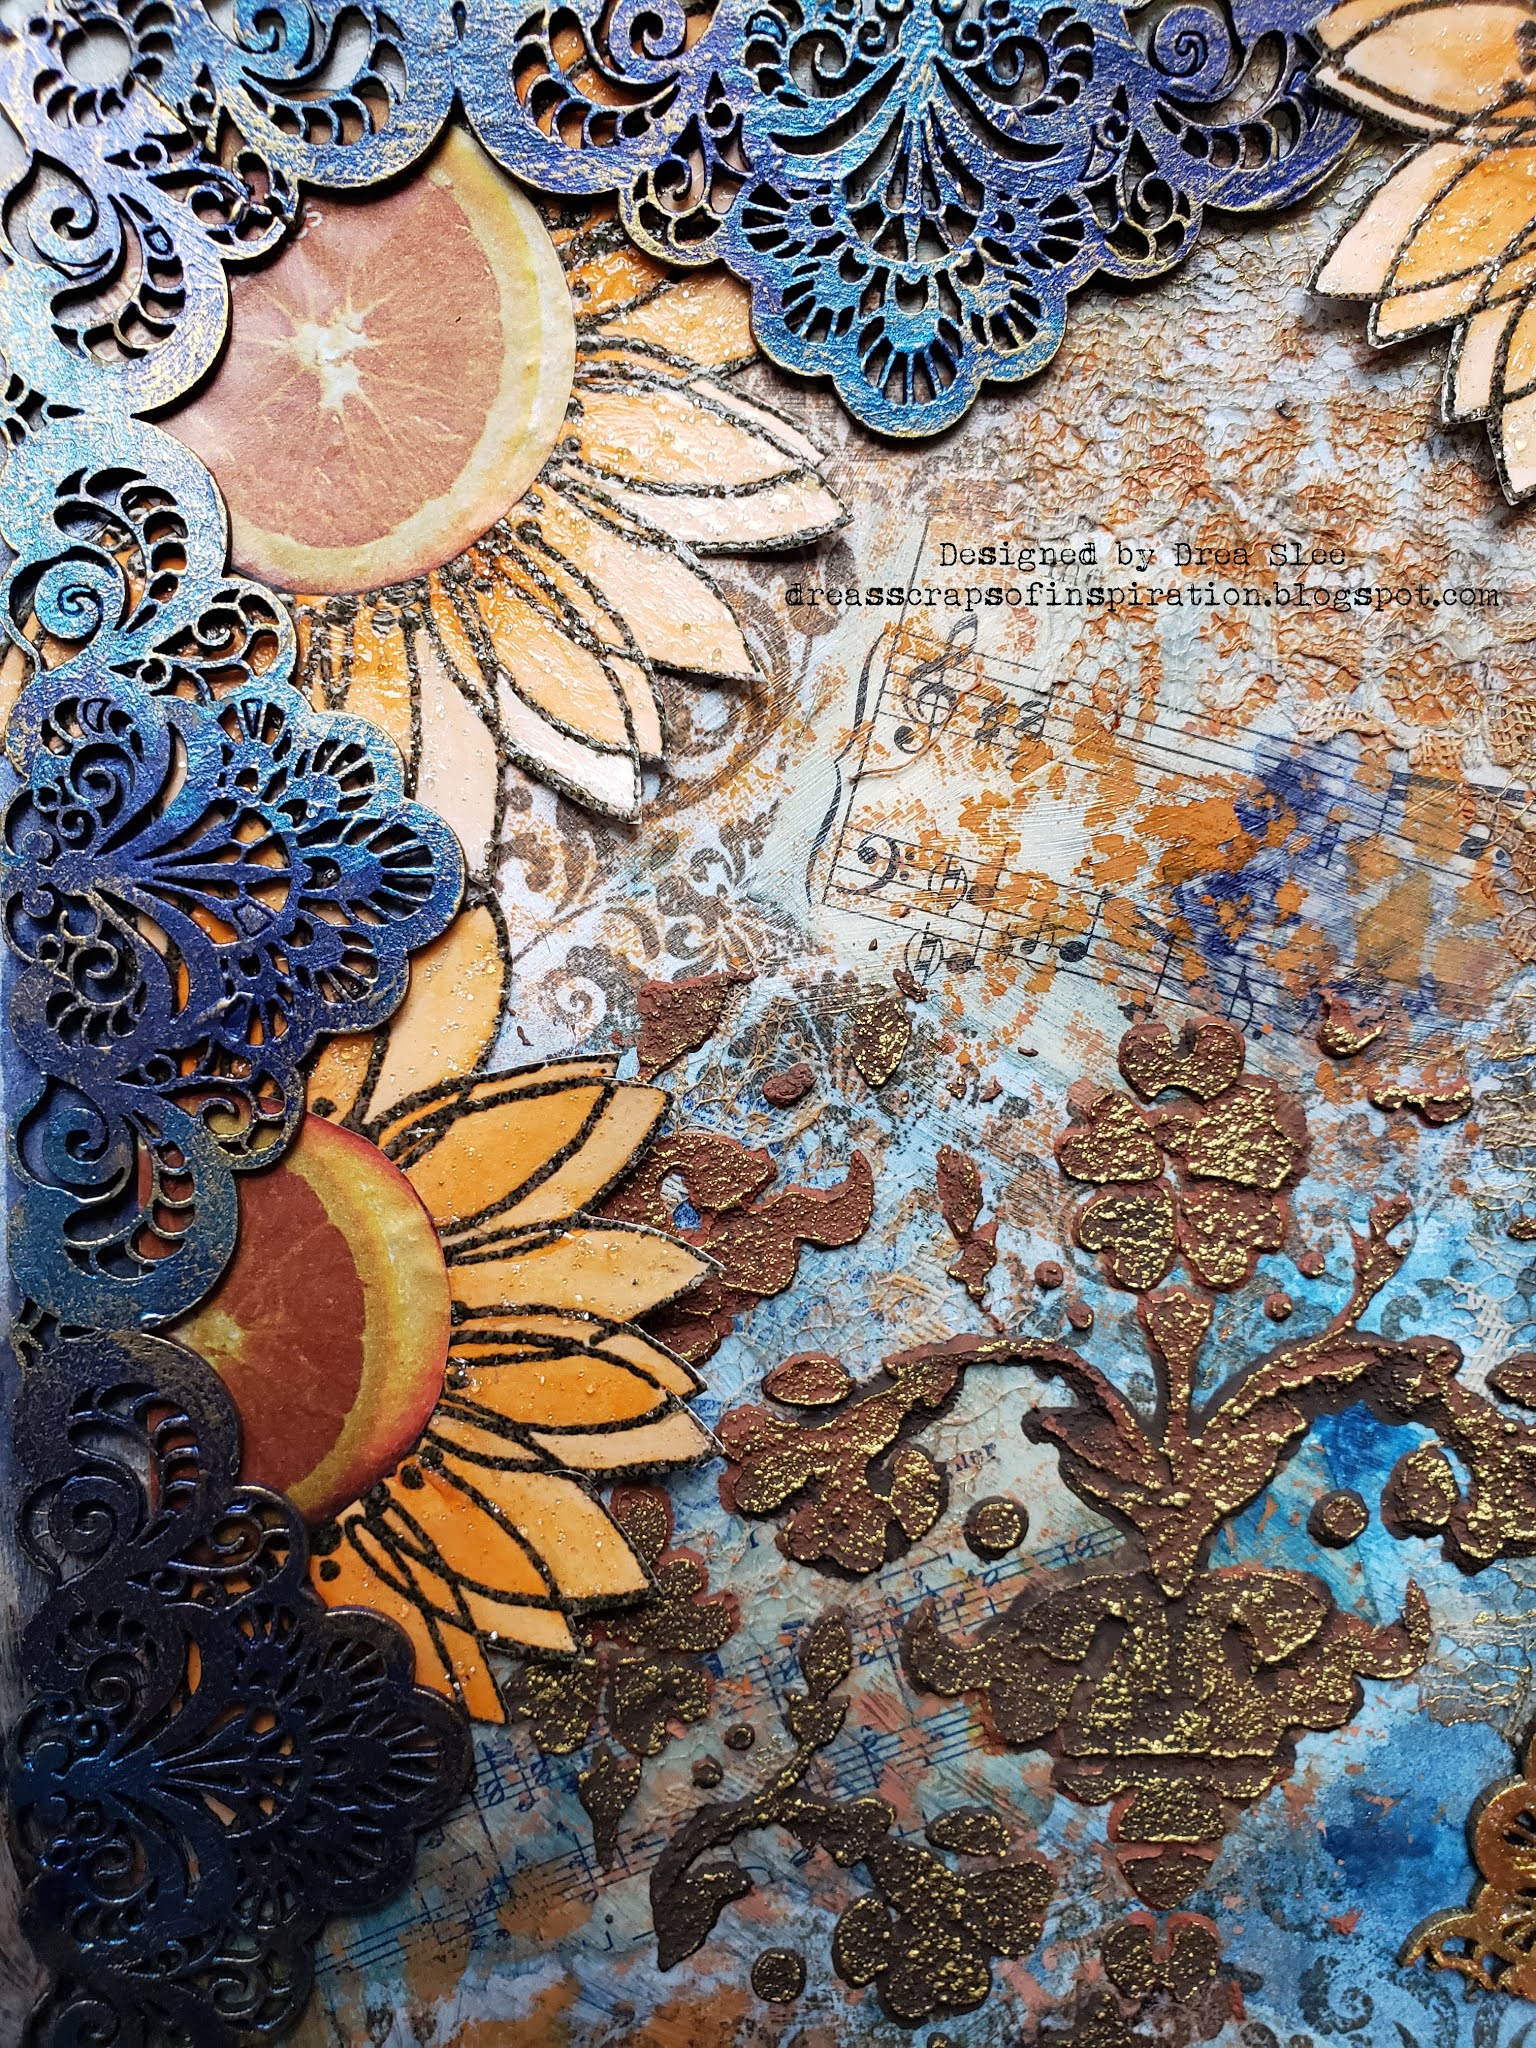
      Before the arrival of Spring, I wanted to play with some Winter stencils and stamps, as shown on this art journal spread. However, it is full of mistakes, and much darker and messier than I was intending, which could be a lesson in what NOT to do. Lol!


     I started by collaging torn pieces of stamped papers and tissue paper, along with some recycled mail using Prima Soft Matte Gel. To create a resist effect, I stamped and embossed the icicles on top with the Grunge Icicle Border Stamp from Creative Embellishments using Ranger (Rainbow Sparkle) Embossing Powder, which was also used with the Snowflake Stencil. Then I colored it with (Hickory Smoke and Black Soot)  Distress Spray Stains. 


     I'm very disappointed in my trees, but decided to keep them anyways. With the Tree's Stencil I painted an ombre effect with Art Alchemy Paints, starting with Raven Black on the bottom, and Pearl White on top. The middle is a mix of the two colors, which made silver. Then I tried to do a messy double outline with a Black Ultra Fine Sharpie, and literally went through 4 brand new pens, that just stopped working for me half way through. It could've been from all of the texture on my page, but wanting to move on, I decided on a thicker line, using a Fine Sharpie, which was my first mistake. Not liking the harsh outline, I used a brush to blend it with (Black Soot) Distress Spray Stain, which helped a little. The masked trees in the background were done with cutouts from the Tree's and 3 Tree Stencil spritzed with (Black Soot) Distress Oxide Spray. But I forgot to shake it first (another mistake), so I didn't get that oxide effect. For a snowy effect, I splattered (White Linen) Dylusions Paint over both pages. 


     To mimic cracked ice in a river, I applied my new Emerald Creek (Silver) Embossing Flakes, which took some patience, and had to be done one at a time. But the results are well worth it, even though I accidently embossed two flakes together, resulting with the largest one on this page.


     At this point there was no use hiding my Sharpie work, so I did my titlework with it, using the Tim Holtz (Cargo) Stencil, and painted it with (Brushed Pewter) Distress Spray Stain. Then I went over it and the icicles with Finnabair (Crushed Ice) Effect Paste. 


     Thanks for looking, and take care! 

*******************

Challenges Entered:

Creative Embellishments ~ February Challenge


Art Journal Journey ~ Heavy Metal

The Funkie Junkie Boutique Blog ~ Mostly Neutral

Simon Says Wednesday Challenge ~ Anything Goes

The Creative Crafters ~ #37

Sunday, February 21, 2021

Adore Apples Tag

      Hi everyone! I hope you're taking care and enjoying the rest of the weekend! I had fun making this mixed media tag with lots of stamping!


     A mix of Finnabair Stamps created the background starting with (Checkered Texts) used with Ranger Archival (Jet Black) Ink. Then I collaged some washi tape and torn pieces of white tissue paper, stamped with (Gothic Book) and an older Prima script stamp with Prima Soft Matte Gel. I went over it all with some white gesso and (White Linen) Dylusions Paint. Once it dried, I stamped the small butterflies with the Rust & Dust Stamp. 


     The heart was a leftover diecut that I had in my stash and got covered with Prima Heavy Black Gesso. Then I embossed it with Emerald Creek (Onyx Frost) Embossing Powder. 


     The chipboard Steampunk Key from Creative Embellishments was also covered with Prima Heavy Black Gesso, and rubbed with Finnabair Metallique Waxes (Brushed Iron and Old Silver). 


     The flowers, leaves, and "Apples" are part of the apple stamp, and were all embossed with Emerald Creek (Onyx Frost) Embossing Powder. Then I painted the apples with watercolors. 


     Finally, I used some alpha stickers from the Bo Bunny (Love & Lace) Collection to spell "Adore". 


Saturday, February 13, 2021

Blended Slimline Birthday Card

      I can't believe my only child turned 19 today! He LOVES every shade of blue, so I played with blending my Lindy's Gang Sprays on his birthday card, adding purple for his birthstone, amethyst. 


     Stamping was the first step using the Prima (Salvage District) Stamp with Ranger Archival (Jet Black) Ink onto heavy white cardstock. Then I used a flat brush to blend Lindy's Gang Sprays from the bottom with Ocean Breeze Blue, Delphinium Turquoise, Afternoon Delight Denim, and Urban Amethyst on top. The slimline  was perfect to showcase the Circuit Stencil from Creative Embellishments with Prima Heavy Black Gesso applied to it. Once dry, I lightly went over it with (Old Silver) Finnabair Metallique Wax.


     I also added the same wax to the numbers done with the Tim Holtz (Numbered) Stencil.


     The sentiment was stamped with the Savvy Sayings Unmounted Rubber Stamp from Red Rubber Designs, and embossed with Emerald Creek (Black Cherry) Aroma Embossing Powder. It's framed with black gesso added to a section of the (Rivet) Stencil from Creative Embellishments, and also finished with wax, with a strip of silver ribbon underneath. 


     Thanks for looking, and have a great week! 

************************
Challenges Entered:


Tuesday, February 9, 2021

Spring ATC's

      Hi everyone! Gloomy days call for happy, bright colors, as shown on my latest set of Artist Trading Cards. 


     My inspiration and colors came from the February Color Challenge at Lindy's Gang.


     I started by painting a strip of heavy watercolor paper with Lindy's Gang Magicals (Hi Maintenance Magenta, Yodeling Yellow, Lederhosen Laurel, and Guten Tag Teal) and Sprays (Urban Amethyst and Freaky Frankenlime). The green is a mix of Freaky Frankenlime Spray with Magical Shakers (Lederhosen Laurel and Yodeling Yellow). Then I cut four to measure 2 1/2" X 3 1/2". 


     All of the stenciling was done with Ranger Archival Ink (Jet Black) applied to three different stencils. 


     The white flowers were stamped and embossed with Lindy's Gang (Purely White) Embossing Powder. Then I embossed the black ones onto white cardstock with LG (Midnight Pewter) Embossing Powder, painted them with the same colors in the background, curled up the petals, and added white puffy paint to the centers. 


     The clips were originally black, and got transformed with LG (Purely White) Embossing Powder, also used for the Spring words that were embossed onto strips of black cardstock. This one is my favorite! 


        Thanks so much for stopping by, and take care! 

**********************

Challenges Entered:

Lindy's Gang ~ February Color Challenge


Lindy's Gang Products Used:


Sunday, January 31, 2021

Orange Blossom Fairy Art Journal

      Growing up in Southern California, we always had different types of fruit trees, and I remember January being the month when the oranges would ripen up and taste the best. For some reason, they always tasted SO much better than the oranges sold at the grocery stores! But perhaps it was just fairy magic, as depicted on my latest art journal page? 


    The rest of my inspiration came from the Finnabair January 2021 Art Recipe. Any excuse to play with my stencils and effect pastes, and I LOVE the color combo! 


     It started as a collage of vintage sheet music, dictionary pages, lace, and stamping, adhered with Prima Soft Matte Gel. Then I painted it with Art Alchemy Metallique Paints (Rustic Brown, Fresh Orange, Deep Waters, and Midnight Sky), along with Sparks (Ginger Magic), adding lots of water to create some transparency.


     The orange color in the background was done with (Rusty Hinge) Distress Oxide Spray sprayed through the Finnabair (Floral Net) Stencil. Then I applied Finnabair (Red and Brown) Rust Effect Pastes to the Finnabair (Vintage Wallpaper) Stencil. Once dry, I added touches of (Vintage Gold) Metallique Wax, also added to the lace.


     All of the oranges were cut from magazines. The sliced ones were added to the flower centers that were embossed with Emerald Creek (Burnt Copper Leaves) Embossing Powder. I created a border with them using the Chipboard Lacy Border from Creative Embellishments, cut at an angle to make the corner piece. Then it was painted with Art Alchemy Paints (Deep Water and Midnight Sky), and more touches of Metallique (Vintage Gold) Wax.


     I played with my new Prima watercolors for the first time on this page, and absolutely LOVE them! They were used on the flowers and blush for the fairy. Then I finished the flowers with the new Finnabair (Crushed Ice) Effect Paste.


     The fairy was fussy cut from some older Prima paper. Her wings, which are the leftover pieces cut from the chipboard, were painted with Art Alchemy (Fresh Orange and Ginger Magic) Paints, and sealed with (Crushed Ice) Effect Paste.


      I'm so glad I was able to "squeeze" this in before the end of the month! Lol! Thanks for looking! 

***********************

Challenges Entered:

Finnabair ~ January 2021 Art Recipe